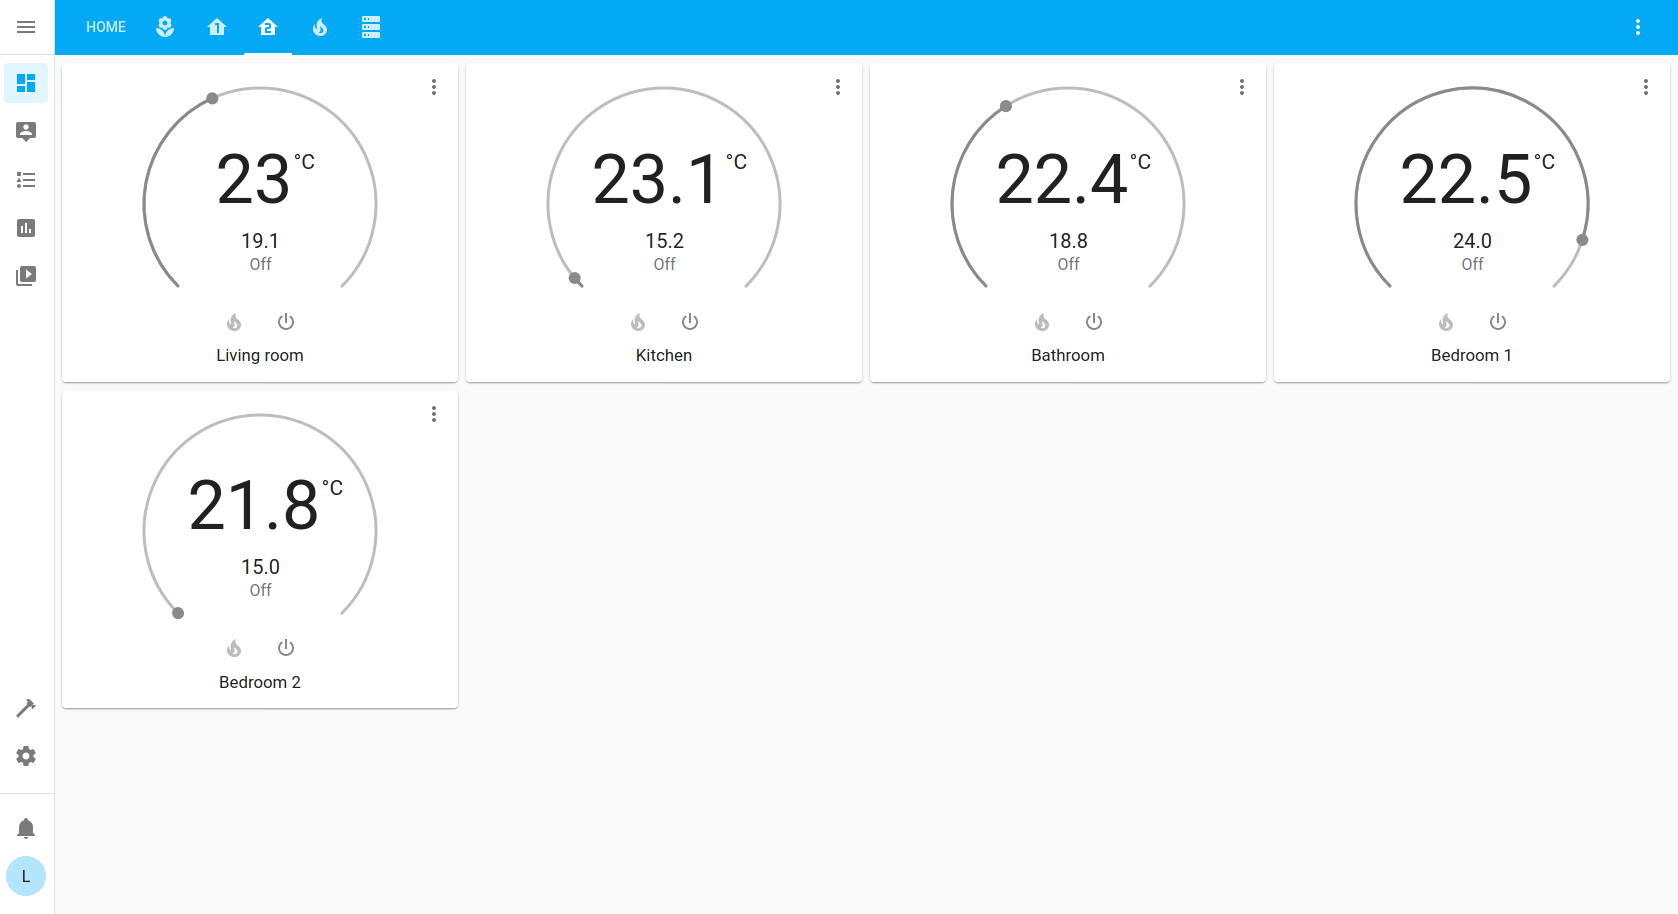
This document briefly describes how to set up a basic Home Assistant environment to contorl 5 heating zones using a HA-EA-S device.
Created: 08/09/2021
Last modified: 26/05/2021
Version: 4
Created by: Lukas D'Angelo
Overview
The heating zones are defined:
- Living room
- Kitchen
- Bathroom
- Bedroom 1
- Bedroom 2
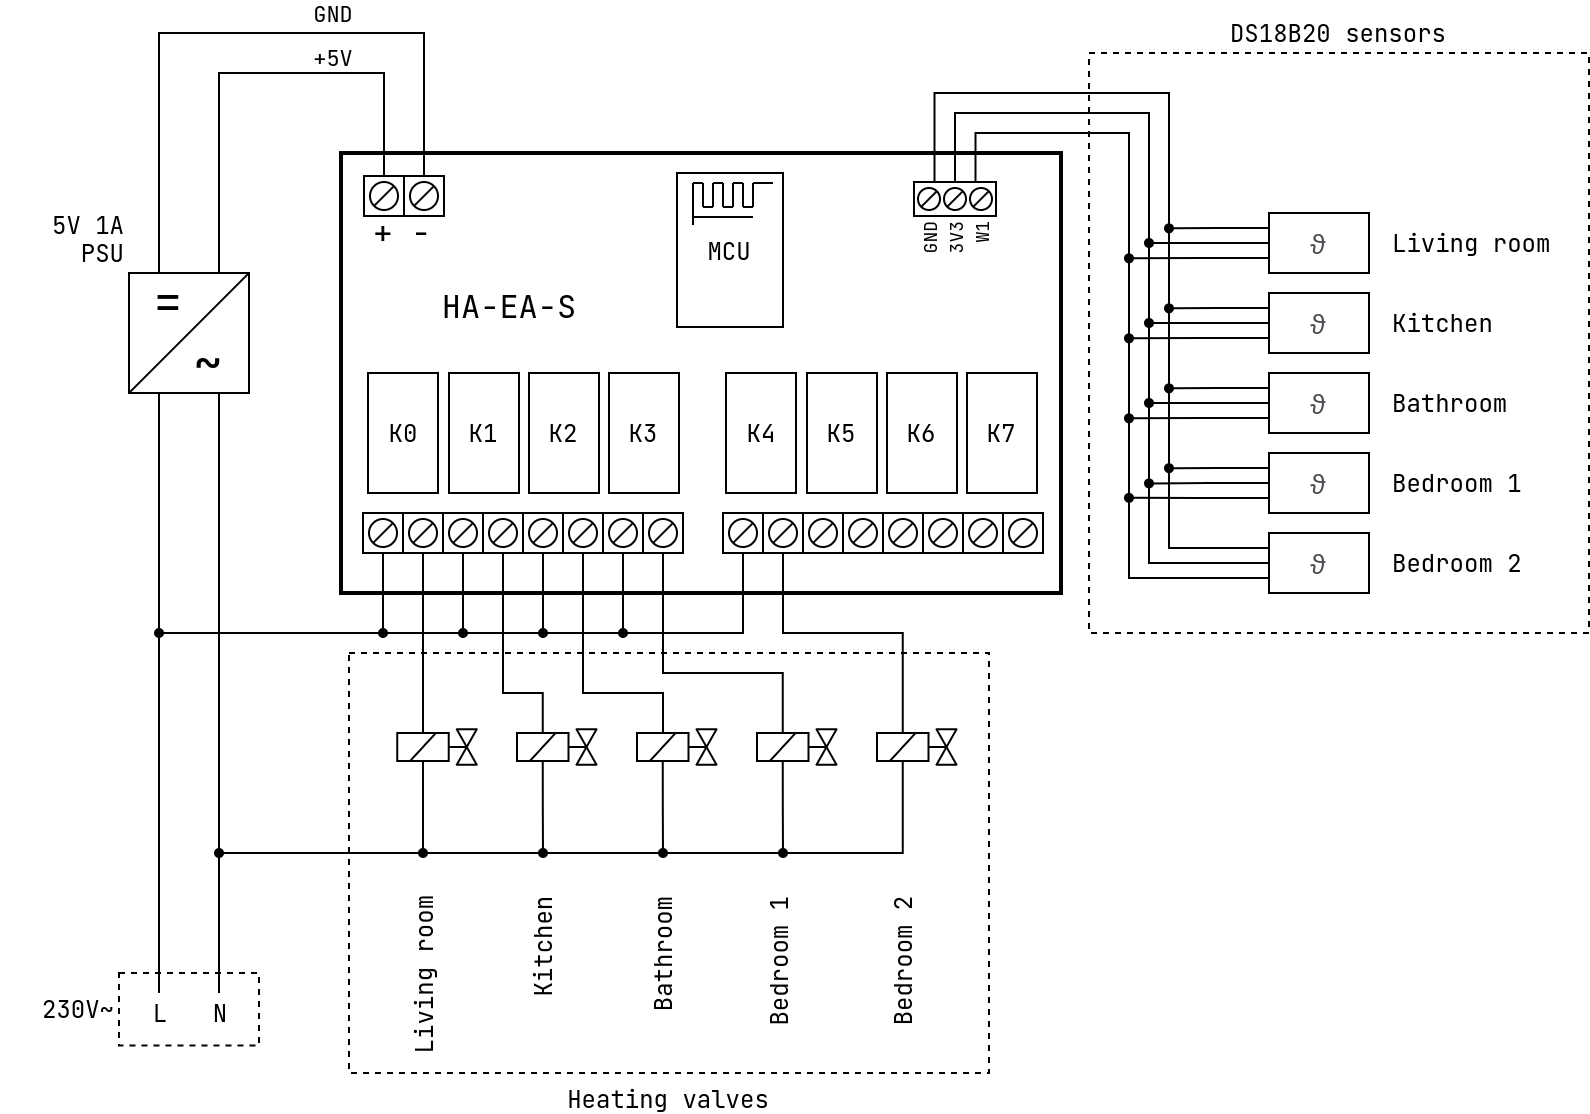
Each zone has its own electrical valve (230V~) which controls the radiator(s) and has a temperature sensor for temperature feedback.
Wiring
Network
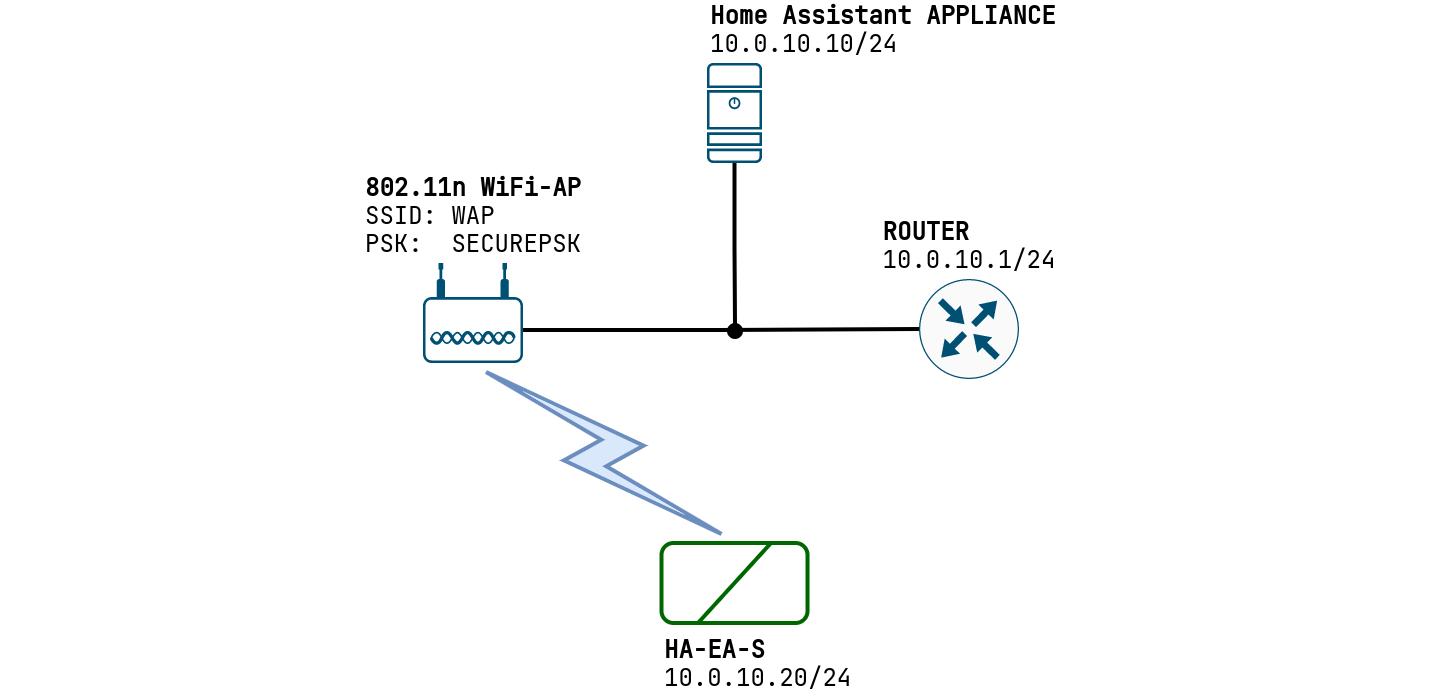
The Home Assistant APPLIANCE (e.g. Raspberry Pi) runs Debian 11 Bullseye including the following software:
- Python 3.9 venv with Home Assistant
- Eclipse Mosquitto MQTT broker
The static IP-address of the Home Assistant APPLIANCE is set to 10.0.10.10/24. 10.0.10.20/24 is statically assigned to the HA-EA-S device and 10.0.10.1/24 is assigned to the interface of the ROUTER, which also provides DNS service and forwards traffic to other networks.
Setting up
Home Assistant APPLIANCE
We prepare a host with a fresh installation of Debian 11 Bullseye. We continue with the configuration of the static IP address. Finally we install Home Assistant with the following commands:
Installing the requirements
sudo apt install python3 python3-dev python3-venv python3-pip libffi-dev libssl-dev libjpeg-dev zlib1g-dev autoconf build-essential libopenjp2-7 libtiff5 tzdata
Creating an user
sudo useradd -rm homeassistant
Installing the virtual environment
sudo mkdir /srv/homeassistant
sudo chown homeassistant:homeassistant /srv/homeassistant
sudo -u homeassistant -H -s
cd /srv/homeassistant
mkdir .homeassistant
python3.9 -m venv .
source bin/activate
python3 -m pip install wheel
pip3 install homeassistant
Source: Install Home Assistant Core
Creating the .service file
We create /etc/systemd/system/home-assistant@homeassistant.service with the following content:
[Unit]
Description=Home Assistant
After=network-online.target

[Service]
Type=simple
User=%i
WorkingDirectory=/srv/homeassistant/.homeassistant
ExecStart=/srv/homeassistant/bin/hass -c "/srv/homeassistant/.homeassistant"

[Install]
WantedBy=multi-user.target
Enabling autostart of Home Assistant
sudo systemctl --system daemon-reload
sudo systemctl enable home-assistant@homeassistant
sudo systemctl start home-assistant@homeassistant
Note: After starting home assistant, it may take some time for post installation processes, be patient!
Installing Eclipse Mosquitto
sudo apt install mosquitto mosquitto-clients
Creating the MQTT user
We define a MQTT user ha-ea with password mqttpass:
sudo mosquitto_passwd -c /etc/mosquitto/passwdfile ha-ea
Password:
Mosquitto configuration
The Mosquitto configuration /etc/mosquitto/mosquitto.conf has to be modified, we have to set the passwdfile, we disable anonymous access and set the listener to allow any IP-address on port 1883:
password_file /etc/mosquitto/passwdfile
allow_anonymous false
listener 1883 0.0.0.0
Finally we restart Mosquitto by executing
sudo systemctl restart mosquitto.service
Verifying the two services
We execute netstat -plntu, if everything went right, this should display the following:
tcp        0      0 0.0.0.0:8123            0.0.0.0:*               LISTEN      561/python3
tcp        0      0 0.0.0.0:1883            0.0.0.0:*               LISTEN      -
tcp 8123 -> Home Assistant,
tcp 1883 -> Mosquitto.
HA-EA-S
Accessing the CLI
We power up the HA-EA-S device. If unconfigured, it starts a SOFT-AP broadcasting an 802.11 network:
- SSID: HA-EA_XX:XX:XX:XX:XX:XX
- PSK: HA-EA-CONFIG
where XX:XX:XX:XX:XX:XX is the MAC-address of the device. This network is designed for device setup,
so we connect a WiFi enabled PC to it. The PC obtains a IP-address automatically over DHCP.
On UNIX or GNU/LINUX based PCs the included telnet command can be used to connect to HA-EA, the default IP-address of the SOFT-AP-interface is 10.0.0.1.
telnet 10.0.0.1
Trying 10.0.0.1...
Connected to 10.0.1.1.
Escape character is '^]'.
HA-EA login:
Note: On Windows PCs, putty is recommended to establish a telnet connection.
Default login parameters:
- username: root
- password: password
Note: The serial connection can also be used to access the CLI, see Header & connector description for parameters.
Configuring the basics
We set the hostname to HA-EA-1:
$ hostname HA-EA-1
We change the password to a more secure one:
$ password crypt moresecurepasswd
Configuring the network
We set the parameters of the WiFi connection:
wifi station-ssid WAP
wifi station-psk SECUREPSK
We continue with the IP configuration:
ip address 10.0.10.20
ip netmask 255.255.255.0
ip gateway 10.0.10.1
ip nameserver 10.0.10.1
Configuring MQTT
We set the parameters of the MQTT connection:
mqtt server 10.0.10.10
mqtt port 1883
mqtt username ha-ea
mqtt password mqttpass
We define /HA-EA-1/relays as relays topic and /HA-EA-1/temperatures as sensor topic:
mqtt topic-relays /HA-EA-1/relays
mqtt topic-sensor /HA-EA-1/temperatures
To make the device send the temperature vlaues periodically every 5 minutes (300 seconds), we execute
mqtt send-interval-sensor 300
Configuring the HW platform
For HA-EA-S the following command is required to make the relays work:
hw relay-count 8
The sensor-BUS has to be set to dallas:
hw one-wire-mode dallas
Finishing up
We verify the configuration by executing show config:
$ show config
hostname HA-EA-1
ip address 10.0.10.20
ip netmask 255.255.255.0
ip gateway 10.0.10.1
ip nameserver 10.0.10.1
ethernet disable
wifi enable
wifi station-ssid WAP
wifi station-psk SECUREPSK
wifi soft-ap-mode inactive
wifi soft-ap-ssid HA-EA_XX:XX:XX:XX:XX:XX
wifi soft-ap-psk HA-EA-CONFIG
username root
password crypt buoWcUB8oAdED3mkvDpA7Bb/mMJIdN9/fXb6qTn9HBI=
telnet mgmt enable
telnet port 23
diagmode terminal disable
diagmode mqtt disable
mqtt server 10.0.10.10
mqtt port 1883
mqtt username ha-ea
mqtt password mqttpass
mqtt topic-relays /HA-EA-1/relays
mqtt topic-sensor /HA-EA-1/temperatures
mqtt topic-input-state
mqtt topic-diagdata
mqtt send-interval-relays-state 0
mqtt send-interval-diagdata 0
mqtt send-interval-sensor 300
hw relay-count 8
hw one-wire-mode dallas
Finally, we disable the SOFT-AP, save the configuration and restart the device, as some settings need the device to be restarted to be applied.
$ wifi soft-ap-mode inactive
$ save
Info: Saving running configuration to flash.
$ restart
Note: For debug commands or a detailed explanation of all supported commands see HA-EA Command Reference.
Configuring Home Assistant
Home Assistant should be accessible through http://10.0.10.10:8123, after the initial guided setup through the WEB-UI we have to setup the MQTT Integration and modify the Home Assistant configuration file /srv/homeassistant/.homeassistant/configuration.yaml on the Home Assistant APPLIANCE in order to integrate the functions of the HA-EA-S device.
Installing and configuring the MQTT integration
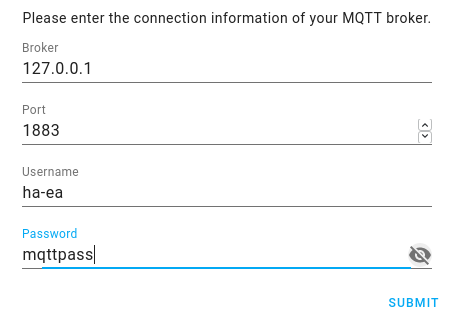
In the Home Assistant WEB-UI, we go to Configuration -> Integrations and add a new integration. We search for MQTT.
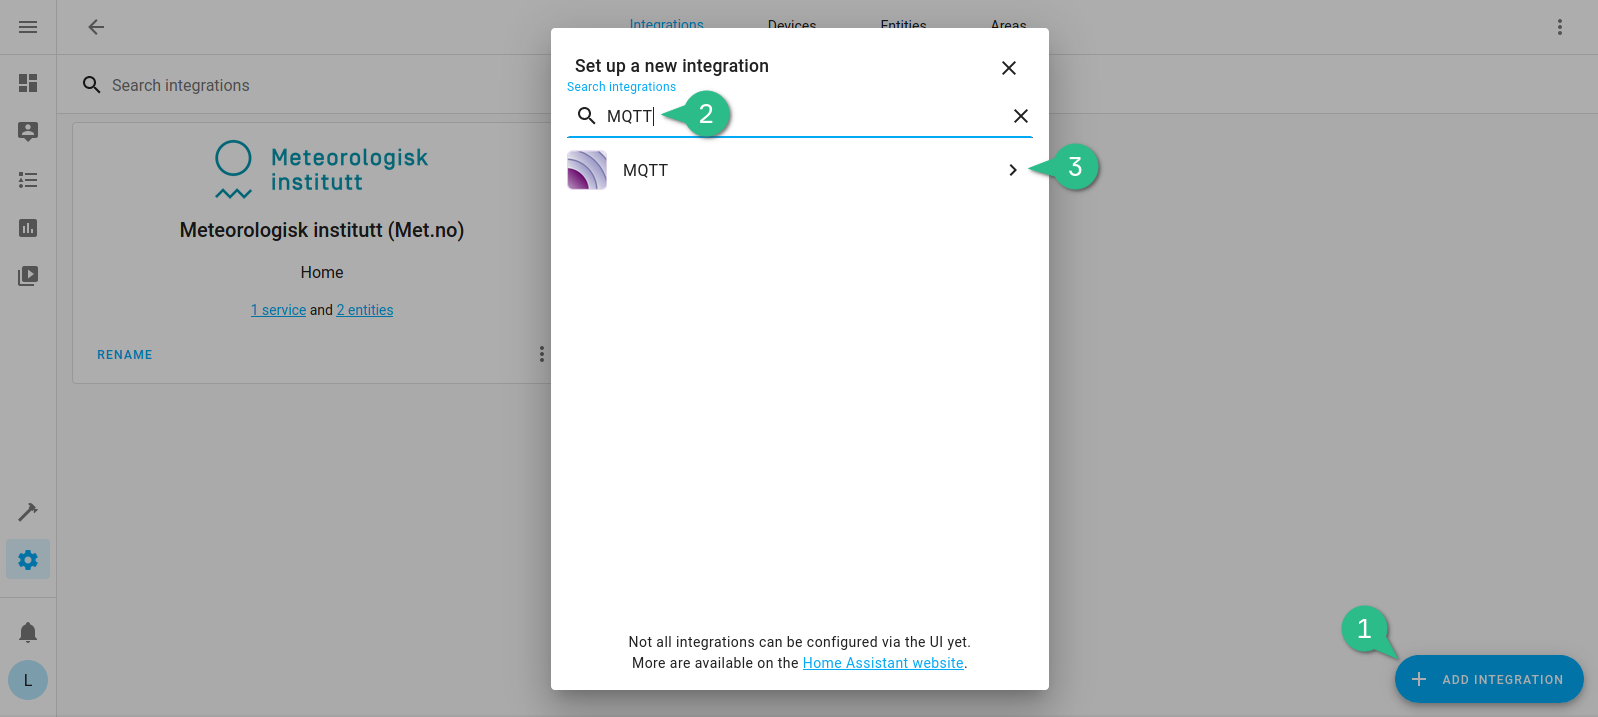
Next we enter 127.0.0.1 for the Broker, as we installed Mosquitto on the same host. Port, Username and Password are the same as defined above.
Temperature sensors
We assume that the serial number of all sensors is known (if not, we can execute show hw on HA-EA-S to show all detected sensors).
- Sensor Living room:
282cdd500800009a - Sensor Kitchen:
28a2fc5008000056 - Sensor Bathroom:
286102510800001b - Sensor Bedroom 1:
28bb2651080000f7 - Sensor Bedroom 2:
2851be5008000017
The following code has to be added to configuration.yaml to integrate the sensors:
sensor:
  # HA-EA-1 PLATFORM
  - platform: mqtt
    name: "Living room"
    state_topic: "/HA-EA-1/temperatures/282cdd500800009a"
    unit_of_measurement: "°C"
  - platform: mqtt
    name: "Kitchen"
    state_topic: "/HA-EA-1/temperatures/28a2fc5008000056"
    unit_of_measurement: "°C"
  - platform: mqtt
    name: "Bathroom"
    state_topic: "/HA-EA-1/temperatures/286102510800001b"
    unit_of_measurement: "°C"
  - platform: mqtt
    name: "Bedroom 1"
    state_topic: "/HA-EA-1/temperatures/28bb2651080000f7"
    unit_of_measurement: "°C"
  - platform: mqtt
    name: "Bedroom 2"
    state_topic: "/HA-EA-1/temperatures/2851be5008000017"
    unit_of_measurement: "°C"
Relays
For the relays we add the following to configuration.yaml:
switch:
  # HA-EA-1 PLATFORM
  - platform: mqtt
    name: "Heating living room"
    state_topic: "/HA-EA-1/relays/K0_state"
    command_topic: "/HA-EA-1/relays/K0"
    payload_on: "1"
    payload_off: "0"
    qos: 0
    retain: true
  - platform: mqtt
    name: "Heating Kitchen"
    state_topic: "/HA-EA-1/relays/K1_state"
    command_topic: "/HA-EA-1/relays/K1"
    payload_on: "1"
    payload_off: "0"
    qos: 0
    retain: true
  - platform: mqtt
    name: "Heating Bathroom"
    state_topic: "/HA-EA-1/relays/K2_state"
    command_topic: "/HA-EA-1/relays/K2"
    payload_on: "1"
    payload_off: "0"
    qos: 0
    retain: true
  - platform: mqtt
    name: "Heating Bedroom 1"
    state_topic: "/HA-EA-1/relays/K3_state"
    command_topic: "/HA-EA-1/relays/K3"
    payload_on: "1"
    payload_off: "0"
    qos: 0
    retain: true
  - platform: mqtt
    name: "Heating Bedroom 2"
    state_topic: "/HA-EA-1/relays/K4_state"
    command_topic: "/HA-EA-1/relays/K4"
    payload_on: "1"
    payload_off: "0"
    qos: 0
    retain: true
Thermostats
To enable the thermostat widgets, we have to configure a generic_thermostat for each zone, we assign the corresponding switches and sensors.
For more details see Generic Thermostat - Home Assistant.
We add to configuration.yaml:
climate:
  # HA-EA-1 PLATFORM
  - platform: generic_thermostat
    name: Living room
    heater: switch.heating_living_room
    target_sensor: sensor.living_room
    min_temp: 15
    max_temp: 25
    ac_mode: False
    cold_tolerance: 0.3
    hot_tolerance: 0
    min_cycle_duration:
      seconds: 5
    keep_alive:
      minutes: 3
    away_temp: 16
  - platform: generic_thermostat
    name: Kitchen
    heater: switch.heating_kitchen
    target_sensor: sensor.kitchen
    min_temp: 15
    max_temp: 25
    ac_mode: False
    cold_tolerance: 0.3
    hot_tolerance: 0
    min_cycle_duration:
      seconds: 5
    keep_alive:
      minutes: 3
    away_temp: 16
  - platform: generic_thermostat
    name: Bathroom
    heater: switch.heating_bathroom
    target_sensor: sensor.bathroom
    min_temp: 15
    max_temp: 25
    ac_mode: False
    cold_tolerance: 0.3
    hot_tolerance: 0
    min_cycle_duration:
      seconds: 5
    keep_alive:
      minutes: 3
    away_temp: 16
  - platform: generic_thermostat
    name: Bedroom 1
    heater: switch.heating_bedroom_1
    target_sensor: sensor.bedroom_1
    min_temp: 15
    max_temp: 25
    ac_mode: False
    cold_tolerance: 0.3
    hot_tolerance: 0
    min_cycle_duration:
      seconds: 5
    keep_alive:
      minutes: 3
    away_temp: 16
  - platform: generic_thermostat
    name: Bedroom 2
    heater: switch.heating_bedroom_2
    target_sensor: sensor.bedroom_2
    min_temp: 15
    max_temp: 25
    ac_mode: False
    cold_tolerance: 0.3
    hot_tolerance: 0
    min_cycle_duration:
      seconds: 5
    keep_alive:
      minutes: 3
    away_temp: 16
Finishing up
Finally, we can verify the Home Assistant configuration throug the WEB-UI: Configuration -> Server Controls -> Configuration validation. If valid, we restart Home Assistant: Configuration -> Server Controls -> Server management.
Now every relay, sensor and thermostat should be accessible in the WEB-UI. We can proceed with the configuration of the dashboards of the WEB-UI. For example, we make a dashboard that contains all thermostats.
